Poblano Peppers Stuffed with Corn Risotto

After a year of living in Los Angeles, I’m still a little bit confused by the seasons. (Yes, we have seasons here.) I was all settled into a routine of eating apples with my granola and yogurt every morning, and suddenly my CSA started delivering peaches, nectarines, and apricots. I frantically checked the calendar. Had I overslept and missed May and June?

Nope, it’s still May, and I’m already crying over how much zucchini is getting delivered to my apartment. (Please send zucchini recipes my way.) I have to stop saying “knee high by the Fourth of July” because we already have sweet corn too. I will admit, it’s not as good as the Midwestern variety, but it’ll do. Summer seems to be here already, even if the calendar says spring.

And yet, I had a little twinge of sadness the other day when I remembered how delightful spring in Minnesota could be. Those heady days of sunshine and snowmelt, when it feels like everyone, even the earth itself, is letting out a sigh of relief. I would grin like a crazy person at the thought of wearing a skirt or ballet flats. I wanted nothing more than to eat my lunch outside and spend lengthy evenings sitting on the balcony, sipping margaritas.

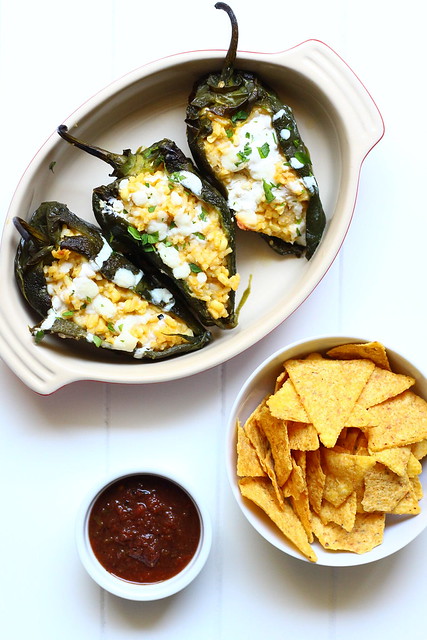
So for those of you who are scattered throughout the rest of the country, waking up to the delights of springtime, here’s a recipe to enjoy with your balcony margaritas. Kernels of sweet corn are folded into a creamy risotto and then stuffed inside roasted poblano peppers. This recipe is warm enough for those still-cool nights, but the flavors will transport you right into summer, wherever you are.

Poblano Peppers Stuffed with Corn Risotto

Poblano Peppers Stuffed with Corn Risotto

••••••••••••••••••••••••••••••••••••••••••••••••••••••••••••••••••••••••

Poblano Peppers Stuffed with Corn Risotto

  • 8 large poblano peppers
  • 6 cups chicken or vegetable stock
  • 2 Tbs. olive oil
  • 1 small onion, chopped
  • 1 garlic clove, minced or pressed
  • 2 cups arborio rice
  • 1/2 cup light beer
  • 1 1/2 cups fresh corn kernels (from about 2 cobs; can also use frozen corn that’s been thawed)
  • 3/4 cups freshly shredded Monterey jack cheese
  • kosher salt
  • freshly ground black pepper
  • 1/4 cup crumbled queso fresco or cotija cheese
  • 3 Tbs. sour cream
  • 1 Tbs. milk
  • 3 Tbs. freshly chopped parsley or cilantro

Roast the peppers: You can do this by cooking them on a baking sheet under a broiler, turning every few minutes, until the skins blister. Or, you can roast the peppers on a gas stove by placing them directly on the burner racks with the flame on medium-high, turning every so often until the skins are blistered. On the stove, it takes about 5 minutes for each pepper, so the broiler method is a bit quicker. Transfer the peppers to a bowl and cover the bowl with plastic wrap. Set aside so they can cool slightly.

Heat the stock to a low simmer in a medium saucepan. Turn the heat to low, just to keep the stock warm.

Heat the olive oil in a large saucepan over medium heat until shimmering. Add onion and cook until softened, about 8 minutes. Add the garlic and cook until fragrant, about 1 minute. Stir in the rice and cook for 1-2 minutes. Pour in the beer and scrape up any brown bits on the bottom of the pan. Cook for about another minute, until the beer is mostly absorbed.

Ladle 1 cup of the warm stock into the rice mixture and simmer, stirring frequently, until the stock is absorbed. Repeat with the remaining stock, about 1/2 cup at a time. Stir in the corn with the final 1/2 cup of stock. The total cooking time for the risotto is about 30 minutes, and it will be thick and creamy when done, and the rice should be tender. Stir in the Monterey jack cheese, 1/2 tsp. salt, and a few grinds of black pepper. Taste and adjust the seasoning as desired. Remove from heat.

Preheat oven to 400° F. Uncover the chiles and gently rub off the skins. Carefully slice a lengthwise slit in one side of each chile and pull out the seeds and membranes. Don’t worry about it being perfect, just do the best you can. Stuff each poblano with some of the risotto and arrange in a baking dish. Sprinkle with crumbled queso fresco and bake for 10-15 minutes, until lightly browned on top.

Meanwhile, whisk together sour cream and milk in a small bowl, along with a pinch of salt. Drizzle over the peppers and sprinkle with parsley. Serve immediately.

Source: The Smitten Kitchen Cookbook.

The Ultimate Veggie Burger

I was eighteen and a college freshman the first time I ever tried a veggie burger. My college cafeteria served them every day in the “grill” line, right next to the hotdogs and hamburgers. Some of my more worldly friends ate them quite frequently, even though they weren’t vegetarians. So I decided to try one. It was… meh. Pretty dry and limp, and strangely crunchy and uniform in shape. The cafeteria made a lot of things from scratch, but I’m pretty sure those veggie burgers came straight out of a box. They were decidedly underwhelming.

Here’s the thing: a veggie burger should never be compared to a real beef hamburger. That’s just not fair. But it should be something that deliciously stands on its own, satisfying both meat eaters and vegetarians alike.

I made these veggie burgers for the first time last night and they were a big hit. They’re savory but don’t taste exclusively like mushrooms. The flavor sort of reminds me of wild rice. The recipe has a lot of steps, but the batch makes 12 so you can freeze some for later. Serve them with traditional (or avant-garde) burger toppings, and if you’re feeling really ambitious, you can even make homemade buns. And yes, this might be sacrilegious, but I’m totally thinking of putting bacon on top. Shhhh.

The ultimate veggie burger

••••••••••••••••••••••••••••••••••••••••••••••••••••••••••••••••••••••••

The Ultimate Veggie Burger

  • 3/4 cup brown lentils, picked over and rinsed
  • salt
  • 1/4 cup olive oil, divided
  • 1 lb. cremini mushrooms, trimmed and sliced thin
  • 2 onions, chopped
  • 1 celery rib, chopped
  • 1 small leek (white and light green parts only), chopped and rinsed
  • 2 garlic cloves, minced
  • 3/4 cup medium-grind bulgur, rinsed
  • 1 cup raw cashews (unsalted)
  • 1/3 cup mayonnaise
  • 2 cups panko*
  • pepper

In a medium saucepan, bring lentils, 1 tsp. salt, and 3 cups of water to a boil over medium heat. Reduce heat to medium-low and simmer for about 25 minutes, stirring occasionally, until lentils become soft and fall apart. Drain thoroughly and spread on a rimmed baking sheet lined with paper towels. Lightly pat dry.

Meanwhile, heat 2 Tbs. olive oil in a large skillet over medium heat until shimmering. Add mushrooms and cook for about 8-10 minutes, stirring occasionally, until they have released their liquid and softened. Add onions, celery, leek, and garlic, and cook, stirring occasionally, for about 10-15 minutes, until the vegetables have softened and are beginning to brown. Spread the cooked vegetables on top of the lentils on the baking sheet and let cool to room temperature, about 20 minutes.

Combine 2 cups water, bulgur, and 1/4 tsp. salt in large bowl and microwave (covered) for five minutes. Drain the bulgur in a fine mesh strainer and use a spatula to press out any additional water. Return the bulgur to the bowl and set aside.

Grind cashews in a food processor until they’re finely ground, about 25 pulses. Add the cashews, lentils, vegetables, and mayonnaise to the bowl with the bulgur. Stir until evenly combined. Working in batches, grind the bulgur mixture in the food processor until it is coarsely ground and evenly textured. (This takes about 15 pulses per batch.) Transfer the ground mixture into a separate large bowl as you work. When all the mixture has been processed, stir in panko and 1 tsp. salt. Taste and add additional salt and pepper as desired.

Scoop up about 1/2 cup of the mixture and pack it into a tight, 1/2-inch thick patty with your hands. Repeat with remaining mixture until you have 12 patties.

Heat remaining 2 Tbs. olive oil over medium heat in a large skillet until shimmering. Place four patties in the pan and cook until well browned, about 4 minutes. Flip and cook the other sides until they’re also browned, about 2-4 minutes. Repeat with remaining patties, and serve.

To make ahead, you can freeze the shaped but uncooked patties on a parchment-lined baking sheet until solid. Stack the frozen patties between squares of parchment and store them in a ziplock bag in the freezer. When you’re ready to eat them, sear the frozen patties until brown (see above) and then bake them for 10 minutes in a 350° F oven until warmed through.

Makes 12 veggie burgers.

* While 2 cups of panko worked just fine, I think next time I’ll try using 1 1/2 cups. If you try this before I do, let me know how it works!

Source: America’s Test Kitchen “The Complete Vegetarian Cookbook.”

Brown Rice Bowls with Roasted Carrots, Crispy Kale, and Fried Eggs

I blinked, and just like that, it’s December and the holidays are in full swing. My family packs a ton of holidays into these five weeks. Thanksgiving gives way to Hanukkah, which leads into Christmas, which yields to New Year’s Eve. Each of those holidays seems to revolve around delicious but rich food, be it gravy, latkes, or endless amounts of cookies. (I myself have baked four dozen cookies just in the last two days.)

As much as I love all this holiday food, it’s nice to sneak in some healthier options for everyday meals. These brown rice bowls have quickly become a favorite in my household. Even though they feature simple brown rice (duh) and roasted vegetables, they are totally crave-worthy. The nutty, chewy rice contrasts with a zingy vinaigrette, and soft roasted carrots are complemented by shatteringly crisp kale.  Adding a fried egg on top takes it to the next level, as the runny yolk becomes a lovely, rich sauce all on its own. Are you hungry yet?

The only tricky part of this recipe might be tracking down the za’atar, which is a tangy Middle Eastern spice mixture of sesame seeds, sumac, salt, and dried herbs. You can find it at Penzeys or other spice stores. I promise it’s worth it, but if you really can’t find za’atar (or really can’t stand the idea of one more shopping trip) the carrots should be fine with just a sprinkle of dried thyme instead. Enjoy!

Brown Rice Bowls with Roasted Carrots, Crispy Kale, and Fried Eggs

••••••••••••••••••••••••••••••••••••••••••••••••••••••••••••••••••••••••

Brown Rice Bowls with Roasted Carrots, Crispy Kale, and Fried Eggs

  • 2 cups boiling water
  • 1 cup uncooked brown rice, rinsed
  • kosher salt
  • freshly ground black pepper
  • 5 carrots, peeled and sliced into pieces about three inches long by 1/2-inch thick
  • about 1/3 cup olive oil, divided
  • 2 tsp. za’atar
  • 8 ounces kale, stemmed and sliced into 1-inch thick strips
  • 2 Tbs. red or white wine vinegar
  • 1/2 small shallot, minced
  • 4 large eggs

Preheat oven to 375° F with the racks in the upper- and middle-thirds of the oven. Combine boiling water, brown rice, and 3/4 tsp. salt in an 8-inch square baking dish and cover tightly with foil. Bake on the lower rack until rice is tender, about 45-50 minutes. Remove from oven, fluff with a fork, and let stand for five minutes, covered with a dish towel.

Meanwhile, line a rimmed baking sheet with foil. On the baking sheet, toss carrots, 1 Tbs. olive oil, za’atar, 1/4 tsp. salt, and 1/8 tsp. black pepper. Spread carrots out evenly on the sheet and cover tightly with another piece of foil. Bake on the upper oven rack for 20 minutes.

While carrots are roasting, toss kale with 1 Tbs. oil, 1/4 tsp. salt, and 1/8 tsp. black pepper in a bowl. When the carrots have finished roasting for 20 minutes, remove the foil and spread the kale evenly on top of the carrots. Return the baking sheet to the oven, uncovered, and roast the vegetables for 15-20 minutes, or until the kale is crispy.

To make the vinaigrette, whisk together vinegar, shallot, and 3 Tbs. oil in a small bowl. Season with salt and pepper to taste.

Evenly divide the rice into four bowls. Top the rice with roasted vegetables and drizzle each portion with a tablespoon or so of the vinaigrette. Cover the bowls to keep them warm while you fry the eggs.

Crack the eggs into a small bowl and sprinkle with salt and pepper. Heat 1 tsp. olive oil in a 12-inch skillet over medium-high heat until it shimmers. Carefully slide the eggs into the skillet, cover, and cook until your desired doneness is reached, about 2-4 minutes. Top each rice bowl with a fried egg, and serve.

Serves 4.

Source: Slightly adapted from America’s Test Kitchen “The Complete Vegetarian Cookbook.”

Miso Brown Rice Cakes

When it comes to cooking, I always want to try something new. I rarely make the same thing for dinner twice within a six-month span. I keep a spreadsheet of recipes I’ve tried and loved because I make things so infrequently that I actually forget about them. There are so many amazing recipes out there that I can’t fathom making the same thing over and over again. Not when there are new recipes to try!

I will admit this character flaw trait can be quite annoying. You love something that I cooked for you? Too bad, you probably won’t see it again for half a year. But some recipes are good enough to shake up my system. The minute I took a bite of one of these miso brown rice cakes (which I admit sound totally boring) I immediately wanted to make them for dinner the next night. And the next night. I even ate one cold straight out of the fridge the following day because I couldn’t wait any longer to taste them again.

This recipe has gone into heavy rotation for me, meaning I made it twice within four weeks. The cakes are really savory thanks to mushrooms and miso paste, and a spoonful of spicy mayo kicks up the flavor even more. With a side of sautéed green beans or a salad, you have yourself a hearty vegetarian meal that you’ll want to eat again and again. Trust me.

Miso brown rice cakes

Miso Brown Rice Cakes

  • 8 ounces shiitake mushrooms
  • 3 Tbs. olive or sunflower seed oil, divided
  • 1 Tbs. grated fresh ginger
  • 2 cloves garlic, minced or pressed
  • 3 3/4 cups water or vegetable stock
  • 1 1/2 cups brown rice
  • salt
  • 3 Tbs. red miso paste*
  • 4 green onions, chopped
  • 2 tsp. sesame oil
  • 1 egg plus 1 egg yolk
  • pepper

Gently remove the stems of the shiitake mushrooms by holding the cap in one hand and pulling the stem with the other, near where the stem meets the cap. Discard the stems and roughly chop the shiitakes.

In a 3-quart saucepan, heat 1 Tbs. oil over medium heat until shimmering. Add the shiitake mushrooms and cook for five minutes, stirring occasionally, until just starting to brown. Stir in the ginger and garlic and cook until fragrant, about 30 seconds. Stir in a cup of the water or stock and scrape up the brown bits at the bottom of the pan with a wooden spoon. Add the remaining water, rice, and 1/2 tsp. salt. Bring to a boil, then reduce heat to low and let simmer, covered, for about 50 minutes, stirring occasionally. The rice is done when it’s tender and all the water is absorbed.

Meanwhile, in a large bowl, whisk together miso paste, green onions, sesame oil, egg and egg yolk, 1/2 tsp. salt, and 1/4 tsp. freshly ground black pepper. Set aside.

Spread the cooked rice onto a rimmed baking sheet and let cool for 15 minutes. Transfer the cooled rice to a food processor (working in batches if your food processor is small) and chop for about 10 seconds, or until the rice is coarsely chopped and the mixture is sticky. Transfer the rice to the large bowl with the miso mixture and stir until everything is well combined. Shape the mixture into eight patties, about 3-4 inches in diameter and 3/4-inch thick.

Place the patties onto a baking sheet lined with parchment paper or foil. Refrigerate, uncovered, for 30 minutes, or until firm.

Heat 1 Tbs. oil in a large nonstick skillet over medium-high heat until the oil is shimmering. Transfer four of the chilled rice cakes to the skillet and cook until browned, flipping once, for 2-4 minutes on each side. Be careful when you flip the cakes, as they can be a bit delicate, so don’t try to flip them until you know the bottom side is nicely browned. Transfer the cakes to a plate and cover to keep warm. Repeat with remaining 1 Tbs. oil and four more cakes. Serve hot, with a dollop of spicy mayo (see below) on top.

Source: Slightly adapted from America’s Test Kitchen “The Complete Vegetarian Cookbook.”

* I couldn’t find miso paste at my regular grocery store, so I ordered it online. There are several different types of miso paste so make sure you get the red one; it has a much deeper flavor. Don’t worry if it comes in a large container; the stuff lasts forever in the fridge.

••••••••••••••••••••••••••••••••••••••••••••••••••••••••••••••••••••••••

Spicy Mayo

  • 1/2 cup mayonnaise
  • 1 green onion, finely chopped
  • 2 Tbs. Sriracha hot sauce
  • 1 Tbs. lime juice

Stir all ingredients together in a small bowl and serve.

Source: America’s Test Kitchen “The Complete Vegetarian Cookbook.”

Homemade Pizza Dough

I know this might be a bit polarizing, but I’m going out on a limb here: thin crust is the best kind of pizza. Don’t get me wrong; I love soft, puffy pizza crusts piled with toppings, and I’ll even tolerate deep dish from time to time. But my favorite kind of pizza crust is the kind baked in a blazing hot wood-burning oven that snaps like a cracker when you bite into it. (The crust, not the oven.) Magic.

I don’t have a blazing hot wood-burning oven, but I do have a pizza stone, a peel, and a kickin’ recipe for pizza dough.

This is one of those recipes that I have memorized. 3 cups flour, 2 tsp. yeast, 2 tsp. salt, 2 Tbs. olive oil, and 1 cup water. That’s it. I’ll often mix up the types of flours I use, but the rest stays the same. Roll it out nice and thin, and you have delightfully crispy pizza crust. And no worries, I’ll be sharing a recipe for the delicious pizza you see below soon!

Homemade Pizza Dough

Homemade Pizza Dough

Homemade Pizza Dough

  • 3 cups all-purpose or bread flour (may also swap in up to 1 1/2 cups whole wheat flour for a nuttier, healthier crust)
  • 2 tsp. coarse salt
  • 2 tsp. instant yeast
  • 2 Tbs. olive oil
  • 3/4 to 1 cup warm water

In the bowl of a stand mixer, whisk together flour, salt, and yeast. Attach the dough hook and turn the mixer on to low while gradually pouring in the olive oil. Slowly add the water until the dough comes together. Knead for a couple minutes. The dough should be tacky, but not sticky. (You can also mix and knead everything by hand.) Add more water or flour, a tablespoon at a time, if necessary to get the right consistency.

Let dough rise in a warm place until doubled, about 1 hour. Punch down dough and divide into two pieces. Roll each piece into a ball, cover, and let stand until puffy, about 20-30 minutes. Meanwhile, place a pizza stone in the oven on the lowest rack and heat to the highest heat possible. (Mine only gets to about 450°F.)

Working with one ball of dough at a time, roll it out on a floured surface. Transfer to a pizza peel that has been heavily sprinkled with cornmeal. Jiggle the peel back and forth a bit to make sure the pizza slides instead of getting stuck. Cover your dough with the toppings of your choice and slide the pizza onto the pizza stone in the preheated oven. Bake for 8-12 minutes, until crust is golden brown and crispy.

Source: “How to Cook Everything” by Mark Bittman.

Barley Risotto with Mushrooms and Arugula

I spent last weekend celebrating an amazing friend who’s getting married in a month. Yep, bachelorette party time. We danced, laughed, frolicked, sang, painted, ate, drank, and were merry. It was a ton of fun to catch up with old friends and meet new ones, but by the time I got home I was ready for slightly more virtuous food than the munchies I had been grazing on all weekend.

How about some barley?

I know, it sounds totally unexciting, but this risotto has been one of my go-to comfort foods all winter long. It’s creamy and satisfying but still packed with healthy ingredients. And it’s adaptable; some spring asparagus would be a lovely addition, or shredded chicken. Heck, I even made it with half barley, half farro once, since that was all I had on hand.

One little tip: stir in all the arugula like the recipe says if you’re confident the risotto will be completely eaten in one sitting. But if you’re planning on leftovers, leave the arugula out and just stir a handful into each serving. Then when you reheat a portion for lunch the next day, add fresh arugula to the reheated leftovers until it slightly wilts. The greens stay nice and fresh that way.

Almost as fresh as my bachelorette friend’s dance moves. Almost.

Barley risotto with mushrooms and arugula

••••••••••••••••••••••••••••••••••••••••••••••••••••••••••••••••••••••••

Barley Risotto with Mushrooms and Arugula

  • 1 Tbs. olive oil
  • 1 onion, chopped
  • 1 clove garlic, minced
  • 2 cups sliced baby bella mushrooms
  • kosher salt
  • freshly ground pepper
  • 1/2 cup dry white wine
  • 1 cup pearl barley
  • 4-5 cups vegetable or chicken broth
  • 3 cups arugula
  • 1/2 cup freshly grated parmesan

Heat olive oil in a large saucepan over medium-high heat. Add onion and garlic and cook, stirring occasionally, until onion is soft, about 5 minutes. Stir in mushrooms and a dash of salt and freshly ground pepper. Cook until mushrooms start to brown and release their juices. Stir in white wine and bring to a boil. Boil for 5 minutes.

Stir in barley and 4 cups of broth and bring to a boil. Reduce heat to medium-low and simmer, uncovered, for about 45-50 minutes, until barley is tender. (Add additional broth during this time if the mixture seems dry.)

Stir in arugula and cook for about 2 minutes, or until wilted. Stir in parmesan and additional salt and pepper, to taste. Serve immediately.

Source: Adapted from Williams-Sonoma Eat Well.

Thai Veggie Burgers with Peanut Sauce

I always hesitate to call something a veggie “burger.” After all, a veggie burger isn’t really supposed to taste like a hamburger in the first place. Should it be called a veggie patty instead? Veggie cake? Meatless mass? Scratch that last one.

This veggie burger contains ground chickpeas, but it’s definitely not falafel. (Which is hands-down my favorite word for a bean-based patty.) Whatever it is– and I’m just gonna go with Thai veggie burger– you’ll want to make this recipe soon. The peanut sauce alone is delicious by the spoonful, but it’s even better on top of a nutritious quinoa, oat, and chickpea patty.  (A quinoach patty? No, that’s terrible.)

So while I go off to ponder a more accurate term for veggie burgers, I urge you to give this recipe a try. And it just so happens to be Earth Day, which is a great time to think about ways to reduce our carbon footprints and live more sustainably. (And deliciously!)

Thai veggie burgers with peanut sauce

••••••••••••••••••••••••••••••••••••••••••••••••••••••••••••••••••••••••

Thai Veggie Burgers with Peanut Sauce

Veggie Burgers

  • olive oil
  • 1/2 cup uncooked quinoa, rinsed and strained
  • 1 cup vegetable stock or water
  • 15 oz. can chickpeas, rinsed and drained
  • 3/4 cup uncooked rolled oats
  • 1/2 cup cornmeal
  • 2 cloves garlic
  • 1 tsp. sesame oil
  • 1/4 tsp. paprika
  • 1 tsp. kosher salt
  • 1/3 cup chopped bell pepper
  • 1/3 cup minced red onion
  • 1 egg

Peanut Sauce

  • 1/4 cup. creamy peanut butter
  • 2 Tbs. honey
  • 1 Tbs. soy sauce
  • 2 Tbs. water
  • 1/2 tsp. crushed red pepper flakes
  • 1 tsp. grated fresh ginger
  • juice of 1/2 a fresh lime

Toppings

  • 1 cup sliced cabbage
  • 1 cup shredded carrots
  • juice of 1/2 a fresh lime
  • hamburger buns
  • chopped peanuts

Assemble burgers: Heat 1 tsp. olive oil in a medium saucepan over medium heat. Add the quinoa and cook, stirring constantly, until toasted, about 2-3 minutes. Stir in stock or water and bring to a boil. Reduce heat to low, cover, and simmer for 15 minutes. Remove from heat and let stand, covered, for 5 minutes. Uncover, fluff quinoa, and let cool.

Meanwhile, in a food processor, pulse together chickpeas, oats, cornmeal, garlic, sesame oil, paprika, and salt, until well combined and finely ground. Transfer mixture to a large bowl. Stir in bell pepper, onion, cooled quinoa, and egg, until well combined. Form into six patties.

Make peanut sauce: Whisk together all ingredients until well combined. Set aside.

Prepare toppings: Toss together cabbage, carrots, and lime juice. Set aside.

Cook veggie burgers: Heat 2 Tbs. olive oil in a large frying pan over medium heat. In batches, cook the veggie burgers until browned and cooked through, about 3-4 minutes on each side.

Serve veggie burgers on hamburger buns, with a generous dollop of peanut sauce and sprinkled with peanuts and cabbage-carrot slaw.

Serves 6.

Source: Honey and Figs via Annie’s Eats.