Peanut Butter Stuffed Chocolate Cookies

I waited a little while before posting this recipe because I couldn’t really think of a good story to go with it. I know, I’m sorry. I should’ve just posted this weeks ago. Because the whole time I hemmed and hawed, you were missing out. Here it is: peanut butter stuffed chocolate cookies.

Yep, you read that right. You whip up a batch of soft, chocolatey dough, flatten it out into rounds, and then wrap each piece of dough around a gooey ball of peanut butter. Dip it into sugar for some sparkle and crunch, and gently press it down on a cookie sheet. And when it comes out of the oven– wait, wait, it has to set for just a minute or two– you get to bite into a tender chocolate cookie that oozes with warm peanut butter.

Like I said, I’m sorry. Turns out there was no story needed.

Peanut butter stuffed chocolate cookies

Peanut butter stuffed chocolate cookies

••••••••••••••••••••••••••••••••••••••••••••••••••••••••••••••••••••••••

Peanut Butter Stuffed Chocolate Cookies

Filling

  • 1/2 cup unsweetened peanut butter
  • 1/2 cup powdered sugar

Cookies

  • 1/2 cup sugar, plus additional for rolling
  • 1/2 cup brown sugar
  • 8 Tbs. (1 stick) butter, room temperature
  • 1/4 cup unsweetened peanut butter
  • 1 large egg, room temperature
  • 1 tsp. vanilla extract
  • 1/2 tsp. baking soda
  • 1 1/2 cups flour
  • 1/2 cup cocoa powder

Preheat oven to 375° and line two cookies sheets with parchment paper. Set aside.

To make the filling: Cream peanut butter and powdered sugar together until well combined. Place the filling in the refrigerator to chill until needed.

To make the cookies: In the bowl of a stand mixer fitted with the paddle attachment, beat together sugar, brown sugar, butter, and peanut butter on medium speed until light and fluffy, about 2-3 minutes. Add egg and vanilla and beat on medium-low speed until completely incorporated. Add baking soda and mix for a few seconds until combined. Stir in the flour and cocoa and mix on low speed until the dough comes together. (If it’s really crumbly, you can add a teaspoon or two of milk to help it clump together.)

Turn the dough out onto a large cutting board and roll it into a large log of even thickness. Slice the dough into 20 equal pieces. Remove the peanut butter filling from the refrigerator and divide it into 20 pieces, each one slightly larger than a teaspoon. Roll each portion of the peanut butter filling into a ball.

To shape the cookies, take one piece of chocolate dough and flatten it between your palms into a circle about 3-4 inches wide. Place a piece of the peanut butter filling in the center of the circle, and wrap the sides of the dough up around the filling, pinching them together to form a ball. Dip the top side of the cookie in granulated sugar and place the cookie, sugared side up, on a cookie sheet. Press down with your hand to flatten it out slightly. Repeat with remaining cookies.

Bake for 8-10 minutes, or until edges are slightly cracked and the cookies are set. Let cool on the cookie sheets for a few minutes, then transfer to a cooling rack to cool completely.

Makes 20 cookies.

Source: Slightly adapted from The Baker Upstairs via I Heart Nap Time.

Salted Carmelita Bars

This blog has seen a lot of kitchens. I started writing it while we lived in Madison, in an apartment with an L-shaped kitchen so small I had to store my KitchenAid mixer on a shelf in the bathroom. Then we moved to Boston, and I cooked out of a tiny kitchen that (astonishingly) had no drawers.

Our second apartment in Boston had an awesome kitchen with white cupboards and granite countertops that I still dream about, but we weren’t there for long. Our Minneapolis apartment has the biggest kitchen yet, but the countertop edges are so sharp I have actual scars from running into them.

So many kitchens. So many culinary trials, tears, and triumphs. And now, it’s time to move on to yet another kitchen. In a few short weeks, we’re bidding adieu to our beloved Minneapolis and moving to Los Angeles. Our belongings will follow on a truck a few weeks later, and I will be anxiously waiting their arrival. Because then I can start to organize yet another kitchen, and then it will start to feel like home.

Salted carmelita bars

Carmelita bars are a Minnesota classic, originating (as far as I can tell) in the Pillsbury Bake-off Contest in 1967. The original recipe is delightful, but then I discovered a version that calls for homemade salted caramel sauce and it knocked my socks off. So look out, California friends, because I’m bringing some good ol’ Midwestern cooking like this your way. But it’s gonna come with some long vowels and a lot of me yelling “Gladys, we need more bars!” Okay then? Ohh-kay.

Salted carmelita bars

Salted Carmelita Bars

Bars

  • 2 cups all-purpose flour
  • 1 3/4 cups rolled oats
  • 1 1/4 cups lightly packed brown sugar
  • 1 tsp. baking soda
  • 1 1/4 cups (2 1/2 sticks) unsalted butter, cold
  • 1 cup semisweet chocolate chips

Salted Caramel Sauce

  • 1 cup granulated sugar
  • 1/4 cup water
  • 3/4 cup heavy cream at room temperature (I used lactose-free half ‘n’ half)
  • 3 1/2 Tbs. unsalted butter at room temperature
  • 1 tsp. kosher salt
  • 2 Tbs. all-purpose flour

Preheat oven to 350° F and lightly grease a 9×13 baking dish with butter. Set aside.

Make bars: In the bowl of a stand mixer, whisk together flour, oats, brown sugar, and baking soda. Chop the butter into pieces about 1/2-inch square. With the paddle attachment fitted to the mixer, add butter to the oat mixture and stir at low speed until the mixture is crumbly and the butter is broken into small chunks. Press about 2/3 of the oat mixture into the bottom of the 9×13 pan.

Bake crust for 10 minutes, then remove from oven and sprinkle with chocolate chips. Set aside.

Make caramel sauce: In a medium saucepan, stir together granulated sugar and water. Place over medium heat and let the mixture come to a boil, without stirring. Place a lid on the saucepan and continue boiling for three minutes, so any sugar crystals on the sides of the pan get steamed off.

Remove the lid and continue boiling the sugar mixture– still without stirring– until it’s a deep amber color. Remove from heat. Add the cream carefully; the mixture will violently bubble up. Whisk in butter and salt until smooth and well combined. If there are chunks of hard caramel in the sauce, stir constantly over low heat until they’re melted. Whisk in the flour.

Pour the caramel sauce over the chocolate chips and oatmeal crust. Sprinkle the remaining oat mixture over the caramel sauce. Bake for 15-20 minutes, or until the topping is lightly browned. Let bars cool completely before slicing and serving. Store in the refrigerator.

Makes 24 bars.

Source: Adapted from Erlyce Larson via Tracey’s Culinary Adventures. 

Cookie Dough Ice Cream

Hi friends. Hello again. Sorry for the radio silence. I can blame my lengthy absence from this blog on being very busy and important, but that’s a pretty lame excuse. We’re all busy.  Truth is, with Gabe gone last summer, most of my meals consisted of summer vegetables, baguettes, and cheese, so there wasn’t much to post about. And then after we got married and he was home with me again, I was more interested in cooking and eating food than making my poor husband wait while I photographed our supper in just the perfect light.

But guess what? I missed this space. I’ve still been cooking and recipe tweaking like crazy, but I really missed the creative challenge of food photography. So I’m back. Even though it’s February in Minnesota and the light is mostly gray and the produce is uninspiring. I’m back, and I’m hoping to be seen a little more frequently around here.

Along those lines, here’s an unorthodox recipe for February: ice cream. Cookie dough ice cream, to be exact. I have fourteen ice cream recipes on this blog, so adding one more seems like just the ticket for getting back in the blogging game. Consider it a thank-you from me to you. Thanks for still being here!

Cookie dough ice cream

••••••••••••••••••••••••••••••••••••••••••••••••••••••••••••••••••••••••

Cookie Dough Ice Cream

ICE CREAM

  • 1 cup whole milk*
  • 3/4 cup granulated sugar
  • 2 cups heavy cream*
  • pinch of salt
  • 1 vanilla bean, split in half lengthwise
  • 6 large egg yolks
  • 3/4 tsp. vanilla extract
  • 1/2 cup mini chocolate chips

COOKIE DOUGH

  • 1/3 cup brown sugar
  • 1/3 cup granulated sugar
  • 4 Tbs. unsalted butter, softened
  • 1 tsp. vanilla extract
  • 3 Tbs. milk
  • 1 cup flour
  • 1/2 tsp. salt
  • 1/2 cup mini chocolate chips

Make ice cream: Whisk together milk, sugar, 1 cup of the cream, and salt in a medium saucepan. Warm over medium heat until steamy, stirring occasionally and being careful not to scorch the bottom. Remove from heat and scrape the seeds from the vanilla bean into the saucepan. Place the pod in the mixture as well, cover, and remove from heat. Let steep for 30 minutes.

Meanwhile, pour the remaining 1 cup cream and 3/4 tsp. vanilla into a large bowl. Set a mesh strainer on top. Whisk together the egg yolks in a separate medium bowl. Slowly and carefully pour the warm milk mixture into the egg yolks, whisking constantly. Pour the egg yolk mixture back into the saucepan and place over medium heat again. Heat, stirring constantly with a heatproof spatula or wooden spoon, until the mixture thickens and coats the back of the spoon. (If you’re using an instant read thermometer, it should read between 170° and 175° F.)

Immediately pour the egg yolk mixture through the mesh strainer and into the cream. Stir and chill in the refrigerator for at least 8 hours.

Meanwhile, make the cookie dough: Cream together sugars and butter in a medium bowl. Stir in vanilla, milk, flour, and salt until well combined. Stir in mini chocolate chips. Scoop into balls and place on a cutting board or cookie sheet. Freeze for a couple hours, then chop into smaller pieces. Keep frozen until ready to use.

Freeze ice cream in an ice cream maker according to the manufacturer’s instructions. Once the ice cream is done churning, stir in remaining 1/2 cup mini chocolate chips and cookie dough chunks. Store the ice cream in the freezer.

Source: Ice Cream from The Perfect Scoop, cookie dough adapted from Allrecipes.com, following some of the modifications posted by someone named giggletush (seriously). 

* As always, I use equal amounts of lactose-free half-and-half in place of the milk and cream in this recipe.

Chocolate Peanut Butter Tart

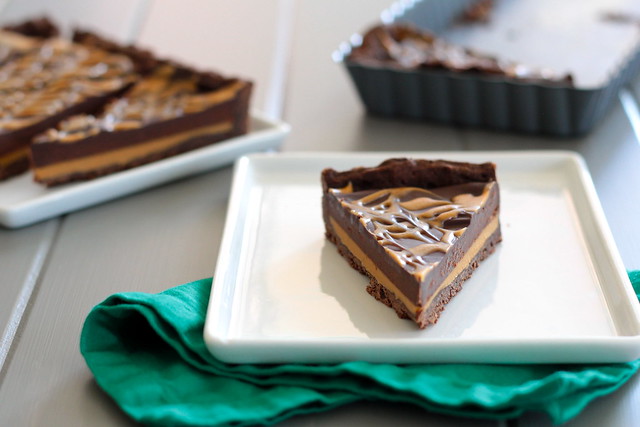
Peanut butter. Chocolate. Math. Add them together and you get one killer dessert.

Gabe’s youngest brother visited us this weekend and picked a chocolate peanut butter tart as his dessert of choice. But before I could make it, I had to play with ratios.

As many of you know, lactose-free half-and-half is one of my favorite ingredients in the whole world, since it lets me make ice cream and other sweet treats for Gabe. But so far there’s no such thing as lactose-free heavy cream, so I have to modify recipes that call for cream. Generally a one-to-one substitution is not a problem, but the difference in fat content can affect the consistency of things like chocolate ganache.

And since ganache plays a starring role in this dessert, some experimentation was necessary. (I sacrificed myself to science and ate a lot of chocolate.) In the end, the winning ratio of chocolate to milk product was 2:1 instead of the original recipe’s ratio of approximately 1:1. You can certainly use the original amounts of 5 oz. chocolate and 3/4 cup heavy cream, but I’m happy to report that my way worked just as well.

And to continue this math and science-laden post, I made a couple of diagrams to demonstrate how to make pretty peanut butter swirls on top of the tart. Just to prove my liberal arts education comes in handy. Check them out at the bottom of this post. :)

Chocolate peanut butter tart

Chocolate peanut butter tart

••••••••••••••••••••••••••••••••••••••••••••••••••••••••••••••••••••••••

Chocolate Peanut Butter Tart

Crust

  • 1/3 cup dutch processed cocoa powder
  • 1 cup flour
  • 8 Tbs. butter
  • 1/4 cup sugar
  • 1 large egg
  • 1 tsp. vanilla
  • 1/4 tsp. kosher salt
  • 2 Tbs. half-and-half

Filling

  • 3/4 cup creamy peanut butter, divided
  • 8 oz. dark chocolate (about 60% cocoa)*
  • 1/2 cup half-and-half

Make the pie crust: In a small bowl, whisk together cocoa and flour. Set aside. In the bowl of a stand mixer fitted with the paddle attachment, cream together butter and sugar for about 2 minutes, or until light and fluffy. Add egg, vanilla, and salt, and beat until well combined. With mixer on low, add half the flour mixture, then all the half-and-half, and then the rest of the flour mixture until well combined. The dough will be very soft.

Place dough on a piece of plastic wrap, flatten into a rectangle shape, and wrap tightly. Refrigerate until firm, at least 1 hour and up to 2 days.

Once dough is firm, place it on a heavily floured work surface and roll into a 7 by 16-inch rectangle. Transfer the dough to a 4 1/2 by 14- inch rectangular tart pan and lightly push it down into the bottom of the pan. Trim off any excess dough around the edges and prick the bottom lightly with a fork. Freeze for 30 minutes.

Preheat oven to 350° F. Place a piece of aluminum foil or parchment paper in the tart pan on top of the dough, and fill with dry beans or pie weights. Place the tart pan on a jelly-roll pan for easier handling and bake for 20 minutes, or until edges are set. Remove foil and beans and bake for another 10 minutes. Let crust cool completely in the tart pan on a wire rack.

Prepare filling: Melt 1/2 cup peanut butter in a small bowl in the microwave for 30 seconds. Pour peanut butter into the cooled pie crust and freeze for 20 minutes or until set.

Once the peanut butter is set, roughly chop chocolate and place in a medium bowl. Microwave half-and-half just until it comes to a boil, about 30 seconds. Pour over chocolate and let sit for 2 minutes.

Melt remaining 1/4 cup of peanut butter in microwave and transfer to a small plastic bag. Snip a tiny triangle off the corner so you can use the bag to pipe the peanut butter.

Whisk chocolate and half-and-half until smooth. Pour over peanut butter in the tart pan and lightly smooth with a spatula. Squeeze the peanut butter in the plastic bag and pipe it diagonally across the ganache. Lightly run a toothpick or skewer through the peanut butter in the opposite direction, perpendicular to the piping of the peanut butter. (See diagrams below.)

Let tart chill in refrigerator for at least 1 hour and up to 8. Slice diagonally into wedges and serve.

Serves 10.

Source: Slightly adapted from Martha Stewart via Annie’s Eats.

* I’m happy to say I’ve made this with milk chocolate too, and it’s deeeelicious. Tastes like a fancy Reese’s peanut butter cup!

pipe peanut butter on tart

Pipe peanut butter diagonally across tart

run toothpick through peanut butter

Lightly run a toothpick through the peanut butter, perpendicular to the original piping

Chocolate Graham Crackers

The idea came to me while I was making ice cream.

A few days prior, I asked Gabe what kind of ice cream he had a hankering for, and he replied, “cookies ‘n’ cream!” So of course I made a whole bunch of chocolate wafer cookies using this recipe, instead of buying oreos to mix into the ice cream. As I was transferring the cookies from the baking sheet to the cooling rack– and a few just happened to make their way into my mouth for quality control– I had a memory, and then an epiphany.

The intensely rich, dark, chocolatey taste of those wafer cookies reminded me of eating chocolate teddy grahams as a little girl. I smiled. And then I thought, “I should make chocolate graham crackers!”

So I studied the tweaks I had made to previous graham cracker recipes, did a little research about cocoa powder, and developed a recipe that was dark and chocolatey but made with 100% whole wheat flour. Something that would taste fantastic on its own but sublime with a dollop of peanut butter. Something to please my taste buds and my conscience. And here it is.

Chocolate graham crackers

••••••••••••••••••••••••••••••••••••••••••••••••••••••••••••••••••••••••

Chocolate Graham Crackers

  • 1 3/4 cups whole wheat pastry flour
  • 3/4 cup dutch processed cocoa powder
  • 1 1/2 tsp. baking powder
  • 1/4 tsp. table salt
  • 1/2 cup (8 Tbs.) unsalted butter, cold
  • 1/2 cup honey
  • 1/3 cup milk
  • 1 tsp. vanilla extract

In the bowl of a stand mixer fitted with the paddle attachment, stir together pastry flour, cocoa, baking powder, and salt until well combined. Roughly chop the butter into 1/2-inch pieces. Add the butter to the flour mixture and stir on low until the mixture resembles a coarse meal. (If you don’t have a stand mixer, you can use a large bowl and a pastry blender.)

In small bowl or glass measuring cup, stir together honey, milk, and vanilla extract. Add to the flour mixture and stir just until the dough comes together. Cover bowl and place in refrigerator for at least an hour.

Meanwhile, preheat oven to 350° F. Line two baking sheets with parchment paper and set aside.

Remove dough from fridge and roll out half onto a lightly floured surface, about 1/8-inch thick. With a knife or pastry wheel, slice into 2-inch by 2-inch squares. Place on parchment-lined baking sheets and lightly poke with a skewer or other kitchen tool to make a dotted pattern. (Believe it or not, I use the poky side of a meat tenderizer.) Bake for 8-10 minutes. Let cool on baking sheets for a couple minutes, then let cool completely on a wire rack. Repeat with other half of dough.

Makes approximately 4 dozen crackers.

Source: A Lingonberry Jam original, inspired by these cookies and my previous adaptation of a Smitten Kitchen recipe.

DIY Chocolate Syrup

I’m the strange sort of person who doesn’t really like chocolate ice cream. Despite this character flaw, I adore vanilla ice cream drizzled with chocolate syrup. I’ve even been known to stir the two together until I get a soft, milkshake-like consistency that looks suspiciously like chocolate ice cream. But it’s not. Because I don’t like chocolate ice cream.

I used to love those bottles of Hershey’s chocolate syrup, until I ruined them for myself by reading the ingredient labels one day. So now I make my own. I lovingly call this “dark chocolate syrup,” as it has a richer, more complex flavor while still retaining the key elements of its industrial cousin: namely viscosity, pourability, and shine. (I’m not really a food scientist; I’m making this up as I go along.)

Anyway, this is a fun recipe for food DIY-ers. With a handful of ingredients and 10 minutes, you can wow your friends and enemies (who are still friendly enough to be invited to your house) by topping some homemade ice cream with homemade chocolate sauce. Stir it together, or don’t. Either way it’s a beautiful thing.

DIY chocolate syrup

••••••••••••••••••••••••••••••••••••••••••••••••••••••••••••••••••••••••

DIY Chocolate Syrup

  • 1 cup sugar
  • 1 cup unsweetened cocoa powder
  • 1 cup water
  • 1/4 tsp. salt
  • 2 tsp. vanilla extract

In a medium saucepan, whisk together sugar and cocoa powder until you’ve broken up most of the clumps. Whisk in water and salt and place over medium heat. Bring to a boil, stirring frequently. Reduce heat to low and simmer for five minutes or until thickened. Remove from heat, stir in vanilla extract, and cool. Transfer to a bottle and store in the refrigerator.

Source: Slightly adapted from 52 Kitchen Adventures.

Peanut Butter Pretzel Truffles

It’s almost Valentine’s Day. Do you have something for your sweetheart? If cooking and baking is your secret Valentine’s weapon, please drop everything and make these truffles right now. Peanut butter, chocolate, and pretzels, the perfect combo of salty and sweet. Oh yes.

These truffles are sure to please all the loves in your life: kids, friends, partner, mailman, golden retriever with a stomach of steel. I’m kidding, please don’t give your pets chocolate. Anyway, making these truffles is almost as easy as picking up a heart-shaped box of chocolates at your local drug store, but you’ll get the warm glow that comes with saying, “Look! I made you something!” Now if you’ll excuse me, I have some chocolate to eat.

Peanut butter pretzel truffles

••••••••••••••••••••••••••••••••••••••••••••••••••••••••••••••••••••••••

Peanut Butter Pretzel Truffles

  • 1 cup creamy peanut butter
  • 1/2 cup powdered sugar
  • 2 Tbs. unsalted butter, softened
  • 2 cups crushed pretzels
  • 12 oz. bittersweet chocolate

Stir together peanut butter, powdered sugar, and butter until creamy and well combined. (You can use a mixer, but it’s not necessary.) Add pretzels and stir until they are completely incorporated into the peanut butter mixture. Using a tablespoon-sized cookie scoop (or your hands), scoop the mixture into about 3 dozen evenly sized balls. Place on parchment lined cookie sheets and freeze for at least 30 minutes.

Chop the chocolate and carefully melt it in the microwave or over a double boiler. Remove the truffles from the freezer and carefully dip each truffle in the chocolate until completely covered. (I generally use a fork to dip the truffles.) Gently shake off excess chocolate and place each truffle back on the cookie sheet. Let cool until fully set.

Makes about 3 dozen.

Source: Annie’s Eats.