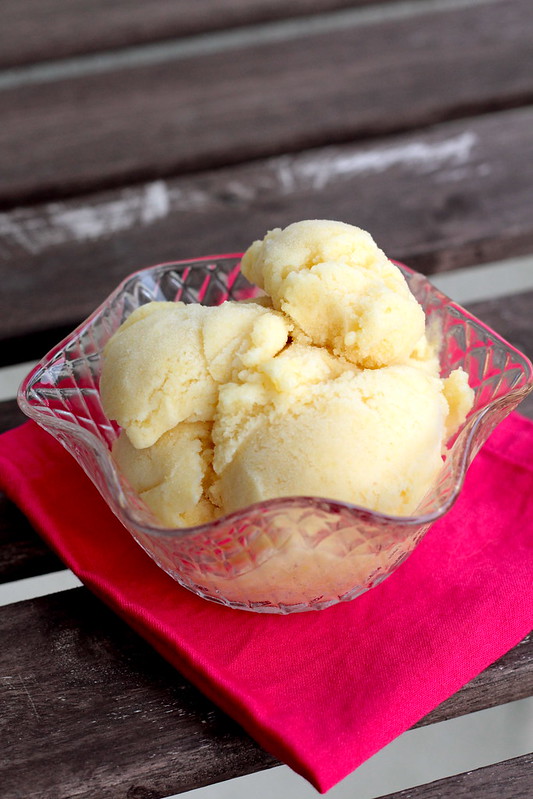
Eggnog Ice Cream

So I guess this is how we do winter in Southern California. We wear sweaters when temps dip into the lower 60s, and we string Christmas lights on palm trees. We cut out paper snowflakes and bake snowflake cookies and listen to “White Christmas” on repeat. And we make holiday-inspired ice cream because, after all, it’s still ice cream season here.

I’m heading to Minnesota next week to get my fill of winter, but I thought I’d give this recipe a whirl before heading to the frozen tundra. Oh my, is it delicious. If you like eggnog (and you really have to like eggnog) you will love this take on it. Also, it’s for grownups. Yep, I spiked the ice cream. (SNL might think that Adele is the answer to holiday family squabbles, but I say if that doesn’t work, try a boozy dessert.)

Adding 1/4 cup of alcohol means the ice cream churns up very soft, but don’t fret! Chill the freshly churned ice cream in your freezer for a few hours and it will firm up nicely but still be delightfully scoopable.

One more thing you should know: freshly grated nutmeg is a must here. I got whole nutmeg from Penzey’s and gently rubbed one of the seeds over my microplane grater until I had a teaspoonful. (The phrase, “What is this lovely fragrance?” definitely entered my mind.)

Wishing you all a lovely holiday season! Thanks for indulging me in yet another year of cooking adventures!

Eggnog ice cream

••••••••••••••••••••••••••••••••••••••••••••••••••••••••••••••••••••••••

Eggnog Ice Cream

  • 2 cups heavy cream*
  • 6 large egg yolks
  • 1 cup whole milk
  • 2/3 cup sugar
  • pinch of salt
  • 1 tsp. freshly grated nutmeg**
  • 4 Tbs. brandy, dark rum, or bourbon***
  • 2 tsp. vanilla extract

Pour the cream into a large bowl and set a mesh strainer on top. Set aside.

Whisk egg yolks together in a medium bowl.

Whisk the milk, sugar, and salt together in a medium saucepan. Warm over medium-low heat, whisking to dissolve the sugar, until the mixture is steamy but not boiling. Carefully pour the warm milk into the egg yolks, a little bit at a time, while whisking constantly.

Pour the egg mixture back into the saucepan and place over medium heat. Stir the mixture constantly, making sure to scrape the bottom, until it thickens and coats the back of a spoon. (The mixture should reach 170° F on an instant-read thermometer.) Pour the mixture through the strainer and into the cream. Stir in nutmeg, spirits, and vanilla extract.

Chill the mixture thoroughly in the refrigerator and then churn in your ice cream machine according to the manufacturer’s instructions. Serve with more freshly grated nutmeg, if desired.

Makes about 1 quart.

Okay, lots of notes here:

* As always, I made this lactose-free by substituting equal amounts of lactose-free half-and-half for both the cream and milk.

** Here’s one of my favorite cooking tips from this recipe: Fold a piece of paper in half, open it, and grate the nutmeg onto the paper. Then refold the paper along the crease to carefully direct the grated nutmeg into your teaspoon.

*** David Lebovitz suggests a mixture of 2 Tbs. brandy and 2 Tbs. dark rum. I did 4 Tbs. bourbon and it was fantastic. Feel free to experiment!

Source: Slightly adapted from The Perfect Scoop.

Patriotic Popsicles

Happy July, everyone! We’re getting ready to head up to Carmel Valley tomorrow for the wedding weekend extravaganza for some dear friends of ours. And since it’s the Fourth of July, we get to celebrate both wedded bliss and ‘Murica. Talk about fireworks.

If you’re feeling inspired to celebrate the good old USA by making frozen treats this weekend, here’s a fun and fairly simple project. I couldn’t resist. Because summer = popsicles, and the Fourth of July = red, white, and blue food.

This recipe is more of a technique than an actual recipe. Feel free to adjust it to fit your own taste preferences and the size of your popsicle molds. One thing I have to mention: for each pouring step, be very careful to fill the molds from the center so you don’t drip any puree on the insides– or you’ll get messy-looking popsicles. Of course, they’ll get messy when they melt (see exhibit A below), but hey, that’s part of the fun! Hope you all have a wonderful Fourth of July!

Patriotic popsicles

Side note: Those of you who know me well understand that two of my least favorite things are being cold and being sticky. Taking this photo was a true labor of love. ;)

Patriotic Popsicles

  • 1/2 pint blueberries
  • 1 cup greek yogurt
  • milk
  • 12 oz. strawberries
  • honey, to taste

In a blender or food processor, puree blueberries until smooth. Taste and add honey if desired. (Remember, things taste more tart once they’re frozen!) Pour equal amounts of the blueberry puree into popsicle molds, filling the bottom third or so of the molds. Freeze until firm.

In a small bowl, stir together greek yogurt and a tablespoon or two of milk until it’s a good pouring consistency. Stir in honey to taste. When the blueberry layer of popsicles is frozen solid, cover it with a short layer of greek yogurt mixture, maybe half an inch or so depending on the size of your molds. Refrigerate remaining yogurt mixture and freeze popsicles until firm.

In a blender or food processor, puree strawberries until smooth. Stir in honey if desired. Pour a layer of strawberry puree into the popsicle molds over the frozen greek yogurt layer. (Keep them close to the same size to resemble the stripes on the flag.) Place tinfoil over the tops of the popsicle molds and insert popsicle sticks. (The foil helps them stay in place.) Freeze until firm.

Finish the popsicles by adding one more layer of greek yogurt and one final layer of strawberry puree, freezing between each step. Once the popsicles are frozen solid, they’re ready to serve. Release from popsicle molds by carefully running hot water over the molds until they loosen.

Makes six three-ounce popsicles.

Source: Oh the Things We’ll Make.

Cookie Dough Ice Cream

Hi friends. Hello again. Sorry for the radio silence. I can blame my lengthy absence from this blog on being very busy and important, but that’s a pretty lame excuse. We’re all busy.  Truth is, with Gabe gone last summer, most of my meals consisted of summer vegetables, baguettes, and cheese, so there wasn’t much to post about. And then after we got married and he was home with me again, I was more interested in cooking and eating food than making my poor husband wait while I photographed our supper in just the perfect light.

But guess what? I missed this space. I’ve still been cooking and recipe tweaking like crazy, but I really missed the creative challenge of food photography. So I’m back. Even though it’s February in Minnesota and the light is mostly gray and the produce is uninspiring. I’m back, and I’m hoping to be seen a little more frequently around here.

Along those lines, here’s an unorthodox recipe for February: ice cream. Cookie dough ice cream, to be exact. I have fourteen ice cream recipes on this blog, so adding one more seems like just the ticket for getting back in the blogging game. Consider it a thank-you from me to you. Thanks for still being here!

Cookie dough ice cream

••••••••••••••••••••••••••••••••••••••••••••••••••••••••••••••••••••••••

Cookie Dough Ice Cream

ICE CREAM

  • 1 cup whole milk*
  • 3/4 cup granulated sugar
  • 2 cups heavy cream*
  • pinch of salt
  • 1 vanilla bean, split in half lengthwise
  • 6 large egg yolks
  • 3/4 tsp. vanilla extract
  • 1/2 cup mini chocolate chips

COOKIE DOUGH

  • 1/3 cup brown sugar
  • 1/3 cup granulated sugar
  • 4 Tbs. unsalted butter, softened
  • 1 tsp. vanilla extract
  • 3 Tbs. milk
  • 1 cup flour
  • 1/2 tsp. salt
  • 1/2 cup mini chocolate chips

Make ice cream: Whisk together milk, sugar, 1 cup of the cream, and salt in a medium saucepan. Warm over medium heat until steamy, stirring occasionally and being careful not to scorch the bottom. Remove from heat and scrape the seeds from the vanilla bean into the saucepan. Place the pod in the mixture as well, cover, and remove from heat. Let steep for 30 minutes.

Meanwhile, pour the remaining 1 cup cream and 3/4 tsp. vanilla into a large bowl. Set a mesh strainer on top. Whisk together the egg yolks in a separate medium bowl. Slowly and carefully pour the warm milk mixture into the egg yolks, whisking constantly. Pour the egg yolk mixture back into the saucepan and place over medium heat again. Heat, stirring constantly with a heatproof spatula or wooden spoon, until the mixture thickens and coats the back of the spoon. (If you’re using an instant read thermometer, it should read between 170° and 175° F.)

Immediately pour the egg yolk mixture through the mesh strainer and into the cream. Stir and chill in the refrigerator for at least 8 hours.

Meanwhile, make the cookie dough: Cream together sugars and butter in a medium bowl. Stir in vanilla, milk, flour, and salt until well combined. Stir in mini chocolate chips. Scoop into balls and place on a cutting board or cookie sheet. Freeze for a couple hours, then chop into smaller pieces. Keep frozen until ready to use.

Freeze ice cream in an ice cream maker according to the manufacturer’s instructions. Once the ice cream is done churning, stir in remaining 1/2 cup mini chocolate chips and cookie dough chunks. Store the ice cream in the freezer.

Source: Ice Cream from The Perfect Scoop, cookie dough adapted from Allrecipes.com, following some of the modifications posted by someone named giggletush (seriously). 

* As always, I use equal amounts of lactose-free half-and-half in place of the milk and cream in this recipe.

Piña Colada Sherbet

You guys have probably noticed that the blog has been a bit quiet lately. Um… I haven’t actually posted since May. Uffda. Starting a new job and planning a wedding has kept me pretty busy, but I also just haven’t been cooking very many new, exciting, “blog-worthy” things.

You’d think that joining a CSA for the first time would lead to a lot of new recipes, but most days I just come home and eat vegetables for supper. One night I just had half a cabbage. It was deliciously braised in olive oil and butter with new potatoes and fresh onions, but still, cabbage. Definitely getting in touch with my Polish ancestors. ;)

All these local, organic vegetables that I pick up every week are gloriously fresh and don’t need much more than a quick sauté, so that’s been my summer. Simple, easy, instinctive cooking rather than meal-planning and poring over new recipes. It’s kind of refreshing. I’m sure once fall starts up again and Gabe is home, I’ll happily jump right back into more ambitious meals. But for now, I’m enjoying the simplicity of summer.

Here’s an easy recipe in honor of yesterday’s National Ice Cream Day: piña colada sherbet that comes together in seconds. (Well, seconds in the food processor and about 30 minutes in your ice cream maker.) With just a handful of ingredients, it epitomizes the simple, laid-back pleasures of summer.

Piña colada sherbet

••••••••••••••••••••••••••••••••••••••••••••••••••••••••••••••••••••••••

Piña Colada Sherbet

  • 1 pineapple, peeled, cored, and chopped (about 4 cups)
  • 1 cup sugar
  • 1 cup unsweetened Thai coconut milk
  • 1 Tbs. dark rum
  • juice of one lime

In a food processor or blender, purée together all ingredients until smooth. Chill the mixture thoroughly in a refrigerator (at least 8 hours), then churn in your ice cream maker according to the manufacturer’s instructions. Serve immediately or transfer to a freezer-safe container and let “ripen” in the freezer for a few hours.

Makes about 1 1/2 quarts.

Source: Very slightly adapted from The Perfect Scoop by David Lebovitz.

Honey Vanilla Ice Cream

Hidden away in my pantry is one of my prized possessions. Tucked between a jar of baked baking soda and a container of dutch-process cocoa powder hides a tightly sealed plastic bag containing over three dozen plump, aromatic vanilla beans. I bought them online a few months ago to replenish my supply of homemade vanilla extract, and every once in a while I open up the bag just to take a whiff and smile. I know, strange.

Lately I’ve felt the urge to actually start using them up, so I’m putting vanilla beans in everything. The subtle flavor is fantastic, but there’s something about the cute little speckles in a vanilla-flecked dessert that really makes me sing. So I stopped my recent peanut butter ice cream frenzy in flavor of an old classic (ha).

Of course, I still wanted to try something a little different, so I made this ice cream with honey instead of cane sugar. I had a bunch of questions: would the honey dissolve all the way? Would the ice cream still be creamy? Would it freeze harder or softer? Would it taste better, or bitter?

In the end, I fell in love with this ice cream. It churned up beautifully and met all my honey- and vanilla-loving desires. Subtle, yet sweet, this ice cream is outstanding on its own but also acts as a perfect vessel for all your favorite toppings. Spoiler alert, I have a recipe for one of those coming up next!

Honey vanilla ice cream

••••••••••••••••••••••••••••••••••••••••••••••••••••••••••••••••••••••••

Honey Vanilla Ice Cream

  • 4 cups half & half (I used lactose-free, as usual)
  • 1/2 cup honey
  • 2 vanilla beans, split lengthwise
  • pinch of salt
  • 4 large egg yolks
  • 2 tsp. vanilla extract

Stir together half & half and honey in a medium saucepan. Scrape the seeds from the vanilla bean pods into the saucepan and then stir in the pods along with a pinch of salt. Heat over medium heat, stirring occasionally, until  hot and steamy but not boiling.

Meanwhile, lightly whisk together egg yolks in a small bowl. Pour a small amount (about a cup or so) of the hot half & half mixture into the egg yolks, whisking constantly. (This tempers the egg yolks so you don’t end up with scrambled eggs.) Pour the tempered egg yolks into the rest of the half & half in the pan and place back over medium heat. Stirring constantly, heat the mixture until it thickens and coats the back of a spoon.

Meanwhile, place a fine mesh sieve over a large bowl. When the ice cream batter has thickened, pour it through the sieve and into the bowl. Stir in the vanilla extract. Place the vanilla bean pods you caught in the sieve back in the ice cream batter to steep. Chill the entire mixture in the fridge for at least eight hours. Remove vanilla bean pods and freeze in your ice cream maker according to the manufacturer’s instructions. Let ripen in the freezer for at least two hours before serving.

Source: Slightly adapted from Ted Allen.

Peanut Butter Ice Cream

How the heck have I not made this before? I mean, really, searching the “frozen treats” section of this blog is kind of embarrassing. Ice cream flavors alone include chocolate, strawberry, Mississippi mud, coffee, cake batter, pumpkin, vanilla-chocolate swirl, seven layer bar, cookie dough, oatmeal chocolate chip cookie, and cookies ‘n’ cream. And then there’s fro-yo, sorbets, popsicles, and granitas.

And yet, I had never made straight-up peanut butter ice cream. Something was clearly wrong.

Despite the plethora of frozen treats on this blog, Gabe and I don’t actually eat sweets very often. So in order to make room for my ice cream maker in the freezer, I had to rearrange 3 lbs. of butternut squash ravioli, 2 lbs. of frozen pulled pork, a loaf of bread, a half dozen whole wheat muffins, and seven different kinds of frozen vegetables. The veggies showed their displeasure by flinging themselves at me whenever I opened the freezer door. Luckily it was all worth it, because this ice cream is divine.

If you’re one of those strange ducks who enjoys a peanut butter jelly sandwich (spoiler alert: I am not one of them), it would be pretty awesome to swirl some jam in the finished ice cream. But if you’re a purist like me, just grab a spoon and dig in.

Peanut butter ice cream

••••••••••••••••••••••••••••••••••••••••••••••••••••••••••••••••••••••••

Peanut Butter Ice Cream

  • 3/4 cup sugar
  • 3/4 cup natural creamy peanut butter (I used unsweetened, since there’s plenty of sugar in the ice cream)
  • 2 2/3 cups half and half (I used lactose-free whole milk, as usual)
  • a pinch of salt

Combine all ingredients in a blender and puree until smooth. Chill at least 8 hours, and then freeze according to your ice cream maker’s instructions.

Source: The Perfect Scoop.

Cherry Sorbet

A couple weeks ago we helped a friend paint the walls of his brand-spanking-new condo. Every once in a while I have those “Wow, we’re all grown up now,” moments, and I think it hit me in a strange way while touring that condo. I was genuinely thrilled that Rob had purchased real estate (eek!), but as he showed us around his new place, I suddenly realized that the things I loved most were his ginormous, organized closet and side-by-side refrigerator/freezer.

Yep, I think that puts me firmly in the grownup camp.

I love our apartment, but I can’t stop thinking about that freezer. Imagine being able to store my ice cream maker permanently in the freezer instead of having to shift around piles of frozen veggies every time I wanted to make ice cream! I could have a steady stream of sorbets, fro-yos, and custards without having to plan 24 hours in advance!

On second thought, it’s probably a very good thing I don’t have that freezer.

P.S. I thought it was appropriate to share a sorbet recipe as temperatures climb near 100° this week and we all head to the Great Minnesota Get-Together. Stay cool and hydrated, everyone!

Cherry sorbet

••••••••••••••••••••••••••••••••••••••••••••••••••••••••••••••••••••••••

Cherry Sorbet

  • 2 lbs. bing cherries, pitted and stems removed
  • 1 cup water
  • 3/4 cup sugar
  • 1 tsp. lemon juice
  • 1 tsp. vodka or kirsch

In a medium saucepan, stir together cherries, water, sugar, and lemon juice. Cook over medium heat until the cherries start releasing their juices, and then continue cooking for another 10-15 minutes, or until the cherries are very soft. Remove from heat and let cool to room temperature.

Stir in vodka and puree cherries in a blender until smooth (I use my stick blender so I don’t have to dirty another dish). Cover and chill for at least eight hours, and then freeze in your ice cream maker according to manufacturer’s instructions.

Makes approximately 1 quart.

Source: Very slightly adapted from The Perfect Scoop.