Miso-Sesame Salad Dressing

I suppose it only makes sense to follow a cookie recipe with a salad recipe. Or rather a salad dressing recipe. You guys have already seen a couple of recipes on this blog from America’s Test Kitchen’s “The Complete Vegetarian Cookbook.” It has quickly become one of my absolute favorite cookbooks as well as my chief partner in meal planning.

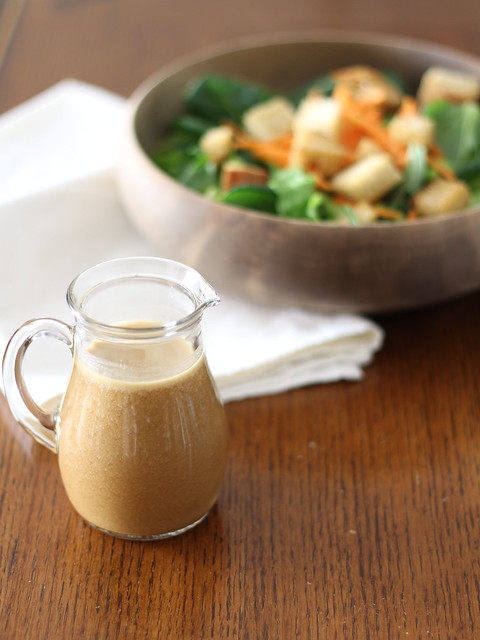
Each week, we get a box of local produce delivered by our CSA. (All winter long! Pinch me!) After sorting through the offerings, I usually flip to the index of this cookbook and decide what meals I want to make for the week. I almost always receive some sort of heirloom lettuce, which gets to be tiresome week after week. So I’ve been working my way through various salad dressing recipes. This miso-sesame dressing has emerged as a favorite so far. It’s savory and salty and garlicky and gingery, and I had to hold myself back from eating it by the spoonful because that’s embarrassing, right?

Given the flavor profile, this dressing goes well with Asian-inspired salad ingredients. I tossed it with a mixture of butter lettuce and tatsoi, carrots, edamame, green onions, and some homemade sesame-crusted croutons. And then I ate it pretty much every day for a week. So good.

Miso-sesame salad dressing

••••••••••••••••••••••••••••••••••••••••••••••••••••••••••••••••••••••••

Miso-Sesame Dressing

  • 6 Tbs. water
  • 1/4 cup rice vinegar
  • 7 tsp. red miso paste*
  • 1 Tbs. soy sauce
  • 1 1/2 tsp. honey
  • 2 Tbs. grated fresh ginger
  • 1 garlic clove, minced
  • 2 Tbs. neutral-tasting oil (I used sunflower seed oil)
  • 1 Tbs. toasted sesame oil

Place water, vinegar, miso, soy sauce, honey, ginger, and garlic in a blender and blend until the mixture is well combined, about 15 seconds. Add oils and blend until the oils are incorporated and the dressing is smooth, about 15 seconds.

Makes about 1 cup.

Dressing can be made ahead and refrigerated for up to 1 week.

Source: Slightly adapted from America’s Test Kitchen “The Complete Vegetarian Cookbook.”

* I couldn’t find miso paste at my regular grocery store, so I ordered it online. There are several different types of miso paste so make sure you get the red one; it has a much deeper flavor. Don’t worry if it comes in a large container; the stuff lasts forever in the fridge. Plus, you can always make miso brown rice cakes!

Salted Caramel Sauce

Welcome to the 200th post on Lingonberry Jam! Although I’m just a hobbyist who’s nowhere near the 1000 posts of my favorite food blogger, it’s still fun to take a moment to reflect on these past few years and how my blog has evolved. Indulge me for a moment as I get all infographic crazy.

Lingonberry Jam Infographic

A few takeaways:

  • People like posts with hyphens in them. Oh, and being on Buzzfeed helps.
  • I wonder how many people are looking for my blog, and how many are just hoping to learn about those tart Swedish preserves they sell at Ikea.
  • My mom rocks. :)

As my 200th post neared, I found myself wondering what recipe I should post to mark the momentous occasion. Perhaps that homemade nutella that I still haven’t quite gotten right? Or a fancy dancy homemade cheese? How about a celebratory cake?

In the end, I decided to go for something simple and versatile: salted caramel sauce. It’s a recipe I’ve made many, many times. It’s something that any dessert lover should learn to master. It’s SO much better than buying caramel topping from the grocery store. And it can be made with a few ingredients you probably already have on hand.

It’s a winner.

Soon I’ll share a fantastic dessert that I topped with this sauce, but for now just enjoy this on ice cream, brownies, apple slices, or by the spoonful (guilty). And thank you SO much for following along with all my cooking adventures!

Salted caramel sauce

••••••••••••••••••••••••••••••••••••••••••••••••••••••••••••••••••••••••

Salted Caramel Sauce

  • 1 cup granulated sugar
  • 6 Tbs. butter, cut into six pieces
  • 1/2 cup heavy whipping cream
  • 1 tsp. kosher flake salt

In a small saucepan with tall sides, heat sugar over medium heat. Stir occasionally with a heatproof spatula or whisk as the sugar melts. The sugar will clump up and then start to liquify and turn a dark amber color. Watch it carefully so it doesn’t burn.

When the sugar is completely melted, add the butter, stirring constantly. The mixture will become quite bubbly, so be careful. When the butter is completely melted, slowly stir in the heavy whipping cream. Again, the caramel will bubble up angrily. Boil the mixture for one minute, then remove from heat and stir in the salt.

Let cool, and transfer to an airtight container. Caramel will keep in the refrigerator for up to two weeks. (If it becomes too thick to stir after refrigeration, reheat in the microwave for 30-60 seconds before using. You might want to store it in a microwave-safe container just in case.)

Makes about 1 cup.

Source: Sally’s Baking Addiction.

Homemade Celery Salt

One of the best things I did while living in Minneapolis was join a CSA, or community supported agriculture program. I loved walking down the street to my neighborhood coffee shop each week and picking up a big box of amazingly fresh organic veggies from a local farm. I eagerly looked forward to the e-mail explaining what would be delivered each week and had fun trying new ways to eat my vegetables.

When we got settled here in LA, I immediately started looking up similar programs. We have a fantastic farmer’s market in our neighborhood every Sunday, but the sheer amount of choices were honestly a bit overwhelming. I would gravitate toward avocados and berries and almost never buy any greens. (Guilty.) So I did some research and joined a local CSA a couple months ago. I love supporting SavRaw* because I get all sorts of fun and interesting produce– summer squash shaped like stars!– and I also get to support local schools as well as sustainable farmers.

So every Sunday, we get a box full of six different veggies and two pounds of fruit delivered right to our door. Usually I’m pretty happy with the choices, but I do let out a groan when I see a huge bunch of celery poking out of the box. Not my favorite vegetable, but I don’t want it to go to waste. I’ll usually slice it up and eat it with hummus, or dice it and throw it in the freezer for winter soups.

One week, I decided to actually do something with the celery leaves themselves: homemade celery salt! Believe it or not, this was super easy and one of those “Why didn’t I think of that before?” projects. The volume can vary, but the leaves of one bunch of celery made about 1/4 cup of celery salt for me. It’s really fresh tasting, perfect for perking up tuna salad or sprinkling on hardboiled eggs. Of course, I still had to eat the stalks themselves, but luckily I had a fresh batch of hummus to help me with that.

* Disclaimer: This post was in no way sponsored by SavRaw. I just love my CSA!

Homemade celery salt

Homemade celery salt

Homemade celery salt

Homemade Celery Salt

  • fresh celery leaves from one bunch of celery
  • flaky sea salt

Preheat oven to 300° F and line a rimmed baking sheet with parchment paper. Pick the celery leaves off the individual stalks and place them in a colander. Rinse the leaves under cold running water and then dry them in a salad spinner or by gently blotting them with paper towels.

Arrange the leaves on the baking sheet in a single layer (use a second sheet if you have to). Bake for 7-12 minutes, watching closely. You want the leaves to dry out completely but not turn brown. Remove baking sheet from oven and let leaves cool completely. They should be very dry and crispy. (If any of the leaves are still soft or wet, you can bake them again in two-minute increments until they’re dry.)

Using a food processor, mortar and pestle, or simply your fingers, crumble the celery leaves until they’re about the same size as the flakes of salt you’re using. Pour the ground leaves into a measuring cup to see how much volume you have, then add the same volume of salt. Stir until well combined. Store in an airtight container.

Yield will vary.

Source: Sassy Kitchen

Homemade Butter

Ah, yes. You knew this day would come, didn’t you? Actually, I first made homemade butter well over a year ago, but I never got around to posting it on the blog. I was recently inspired to make butter again after Gabe and I flew back from Paris a few weeks ago. We spontaneously upgraded our tickets to business class (honeymoon, right?) and were blown away by the experience. I almost cried when I woke up a bit overheated from a nap and was instantly greeted by a flight attendant passing out cookies ‘n’ cream Häagen-Dazs.

There were so many lovely little touches that will make it very hard, alas, for me to continue the rest of my life as a BOTPP (“Back of the Plane Person,” according to my brother-in-law), but I was surprised that one of my favorite parts of the flight was the butter. Yes, you read that right. Since we flew Air France, we were treated to rich, creamy butter from Normandy that was flecked with tiny crystals of sea salt. I shamelessly spread it on my bread as thick as jam. And then I vowed to make some once we got home.

I don’t have cows from Normandy, but I was able to get a pint of organic heavy cream from the grocery store. And using my stand mixer (set to “super domestic”… I mean speed eight), within a few minutes I had about a half pound of soft, rich, homemade butter. I added extra flakes of sea salt to give it that French flair, bien sûr, and you should too!

Homemade butter

Homemade Butter

  • 1 pint heavy cream (organic, and especially grass-fed, will give you the best flavor)
  • 1/4 tsp. sea salt, plus more to taste

Pour the cream and 1/4 tsp. salt into the bowl of a stand mixer fitted with the paddle attachment.* Then cover the entire mixer with a dish towel. I can’t stress this enough: unless you want a kitchen splattered with cream, cover up that mixer.

Turn the mixer to medium high. The mixer will first turn the cream into whipped cream, then it will start to separate. You’ll hear a lot of loud splashing when the solids have separated from the liquids. When you see large chunks of butter have formed and are starting to stick to the paddle, the butter is done. Stop the mixer and use a colander or mesh strainer to drain the liquid into a small bowl. (Congratulations: you have just made buttermilk! Use it for biscuits or pancakes or something.)

Squeeze the butter with your hands and rinse it under cold running water until the liquids run clear. Squeeze as much water as possible from the butter, then taste it and knead in more salt if desired. Form the butter into a ball or sticks and refrigerate. The butter will keep for about a month in the refrigerator, longer in the freezer.

Makes about 8 ounces butter.

Source: Very slightly adapted from Living Well Spending Less.

* I’ve also read that you can use a food processor instead of a stand mixer. I’ve never tried this myself, so please let me know if you try it and it works!

Homemade Pizza Dough

I know this might be a bit polarizing, but I’m going out on a limb here: thin crust is the best kind of pizza. Don’t get me wrong; I love soft, puffy pizza crusts piled with toppings, and I’ll even tolerate deep dish from time to time. But my favorite kind of pizza crust is the kind baked in a blazing hot wood-burning oven that snaps like a cracker when you bite into it. (The crust, not the oven.) Magic.

I don’t have a blazing hot wood-burning oven, but I do have a pizza stone, a peel, and a kickin’ recipe for pizza dough.

This is one of those recipes that I have memorized. 3 cups flour, 2 tsp. yeast, 2 tsp. salt, 2 Tbs. olive oil, and 1 cup water. That’s it. I’ll often mix up the types of flours I use, but the rest stays the same. Roll it out nice and thin, and you have delightfully crispy pizza crust. And no worries, I’ll be sharing a recipe for the delicious pizza you see below soon!

Homemade Pizza Dough

Homemade Pizza Dough

Homemade Pizza Dough

  • 3 cups all-purpose or bread flour (may also swap in up to 1 1/2 cups whole wheat flour for a nuttier, healthier crust)
  • 2 tsp. coarse salt
  • 2 tsp. instant yeast
  • 2 Tbs. olive oil
  • 3/4 to 1 cup warm water

In the bowl of a stand mixer, whisk together flour, salt, and yeast. Attach the dough hook and turn the mixer on to low while gradually pouring in the olive oil. Slowly add the water until the dough comes together. Knead for a couple minutes. The dough should be tacky, but not sticky. (You can also mix and knead everything by hand.) Add more water or flour, a tablespoon at a time, if necessary to get the right consistency.

Let dough rise in a warm place until doubled, about 1 hour. Punch down dough and divide into two pieces. Roll each piece into a ball, cover, and let stand until puffy, about 20-30 minutes. Meanwhile, place a pizza stone in the oven on the lowest rack and heat to the highest heat possible. (Mine only gets to about 450°F.)

Working with one ball of dough at a time, roll it out on a floured surface. Transfer to a pizza peel that has been heavily sprinkled with cornmeal. Jiggle the peel back and forth a bit to make sure the pizza slides instead of getting stuck. Cover your dough with the toppings of your choice and slide the pizza onto the pizza stone in the preheated oven. Bake for 8-12 minutes, until crust is golden brown and crispy.

Source: “How to Cook Everything” by Mark Bittman.

Chocolate Graham Crackers

The idea came to me while I was making ice cream.

A few days prior, I asked Gabe what kind of ice cream he had a hankering for, and he replied, “cookies ‘n’ cream!” So of course I made a whole bunch of chocolate wafer cookies using this recipe, instead of buying oreos to mix into the ice cream. As I was transferring the cookies from the baking sheet to the cooling rack– and a few just happened to make their way into my mouth for quality control– I had a memory, and then an epiphany.

The intensely rich, dark, chocolatey taste of those wafer cookies reminded me of eating chocolate teddy grahams as a little girl. I smiled. And then I thought, “I should make chocolate graham crackers!”

So I studied the tweaks I had made to previous graham cracker recipes, did a little research about cocoa powder, and developed a recipe that was dark and chocolatey but made with 100% whole wheat flour. Something that would taste fantastic on its own but sublime with a dollop of peanut butter. Something to please my taste buds and my conscience. And here it is.

Chocolate graham crackers

••••••••••••••••••••••••••••••••••••••••••••••••••••••••••••••••••••••••

Chocolate Graham Crackers

  • 1 3/4 cups whole wheat pastry flour
  • 3/4 cup dutch processed cocoa powder
  • 1 1/2 tsp. baking powder
  • 1/4 tsp. table salt
  • 1/2 cup (8 Tbs.) unsalted butter, cold
  • 1/2 cup honey
  • 1/3 cup milk
  • 1 tsp. vanilla extract

In the bowl of a stand mixer fitted with the paddle attachment, stir together pastry flour, cocoa, baking powder, and salt until well combined. Roughly chop the butter into 1/2-inch pieces. Add the butter to the flour mixture and stir on low until the mixture resembles a coarse meal. (If you don’t have a stand mixer, you can use a large bowl and a pastry blender.)

In small bowl or glass measuring cup, stir together honey, milk, and vanilla extract. Add to the flour mixture and stir just until the dough comes together. Cover bowl and place in refrigerator for at least an hour.

Meanwhile, preheat oven to 350° F. Line two baking sheets with parchment paper and set aside.

Remove dough from fridge and roll out half onto a lightly floured surface, about 1/8-inch thick. With a knife or pastry wheel, slice into 2-inch by 2-inch squares. Place on parchment-lined baking sheets and lightly poke with a skewer or other kitchen tool to make a dotted pattern. (Believe it or not, I use the poky side of a meat tenderizer.) Bake for 8-10 minutes. Let cool on baking sheets for a couple minutes, then let cool completely on a wire rack. Repeat with other half of dough.

Makes approximately 4 dozen crackers.

Source: A Lingonberry Jam original, inspired by these cookies and my previous adaptation of a Smitten Kitchen recipe.

Homemade Pita Bread

So I realized a little while ago that I had alluded to making pita before on this blog, but I hadn’t actually posted the recipe. Ay dios mio! I’m sure you were all on the edge of your seats just waiting for a pita bread recipe. So here you go!

Pita is actually an incredibly easy thing to make, and homemade pita is leaps and bounds better than the dried out store-bought stuff. I used to dutifully take whole wheat pita pocket sandwiches stuffed with tuna salad for lunch, but now I actually look forward to eating it. Because it’s supposed to be delicious!

Note: This recipe is part two of my latest composite recipe series. See part one, Israeli salad, here. There’s one more post coming. Can you guess what the final recipe will be?

Homemade pita bread

Homemade Pita Bread

  • 2 cups bread flour
  • 1 cup white whole wheat flour
  • 1 1/2 tsp. kosher salt
  • 2 tsp. instant yeast
  • 1 Tbs. honey or sugar
  • 2 Tbs. olive oil
  • 1 to 1 1/2 cups warm water

In bowl of a stand mixer fitted with the dough hook attachment, stir together flours, salt, yeast, and honey. Stir in olive oil and a cup of warm water until a ball of dough forms. Add more water if necessary. Knead on low speed for 6 minutes. (Alternatively, you can stir all the ingredients together with a wooden spoon and then knead by hand for 10 minutes.)

Place dough in a lightly greased bowl, cover, and let rise in a warm place until doubled, about an hour. (I usually heat my oven to its lowest temperature and then turn it off and use it as a warm place to let my dough rise.)

Punch down dough and divide into eight equal pieces. Form each piece into a ball. Cover with a damp towel and let rest for 20 minutes. Meanwhile, preheat oven to 400° F with a pizza stone set on the bottom rack.

Roll out each piece of dough on a lightly floured surface into a round shape about 1/4-inch thick. Working with two to three pieces at a time, place rolled-out dough onto the heated pizza stone and bake for 4-6 minutes, or until puffed and golden. Remove from pizza stone and place on a plate. Repeat with remaining dough. Serve immediately.

Source: The Fresh Loaf.